CVS Repositories view
CVS Repositories view shows the repository locations added to the LyciaStudio.
To expand the repository tree, click the pointer next to the repository location:

The repository tree includes the main trunk (HEAD) and branches. When you expand the branch, you see the folders and files it contains.
CVS Repositories view toolbar

|
|
Home |
shows the location of the selected CVS repository |

|
Back |
undoes the effect of the previous Go into command (i.e. shows the roots displayed before you pressed Go into) |
|
|
Go into |
displays the children of the selected entry |
|
|
Refresh view |
refreshes the contents of the CVS Repositories view |
|
|
Collapse all |
collapses all the roots in the view |
|
|
Add CVS Repository |
brings up the Add CVS repository wizard:
|
|
|
View menu |
opens the drop-down menu ↓:
|
|
|
Minimize |
minimizes the view |
|
|
Maximize |
maximizes the view |


From the drop-down menu of the СVS repositories view, you can perform these actions:
|
|
Filter... |
allows selecting whether the modules are shown or not:
|
|
Remove Filters |
removes the filters |
|
|
Select Working Set |
allows selecting one or more working sets:
|
|
|
Sort by |
allows sorting the repositories by their labels, locations, hosts, or in the order of descent:
|


Structure of the CVS Repositories view:
|
collapsed view |
expanded view |
|
|
|


The structure of the CVS Repositories explorer includes the following nodes:
|
[root node] |
represents the repository itself, includes the name of the repository, its active branch, and the repository location in the file system |
|
HEAD |
represents the main trunk of the repository and provides access to its folders |
|
Branches |
provides access to the repository branches, allows their browsing and manipulation (like creating a new branch or merging branches) |
|
Versions |
represents project versions |
|
Dates |
represents the view history |
CVS Repositories view context menus
The commands available in the context menu depend on the selected node - root, Head, Branches, Versions, or Dates.
Some options are shared by most or several context menu.
Context menu of the root node

|
New |
allows adding more repositories and data tags:
|
|
|
|
Refresh Branches |
refreshes the list of branches displayed in the view:
|
|
Paste Connection |
allows adding a new repository to the CVS Repositories view by pasting its locations from the clipboard (Ctrl + V) |
|
|
Copy to Clipboard |
copies
the identification string of the selected repository (e.g., |
|
|
|
Refresh view |
refreshes the contents of the CVS Repositories view |
|
Discard location |
removes the selected repository |
|
|
Properties |
allows modifying properties of the location, assigning the display name and the server encoding:
|


Context menu of HEAD

|
New ↑ |
allows adding more repositories and data tags |
|
|
Paste Connection |
allows adding a new repository to the CVS Repositories view by pasting its locations from the clipboard |
|
|
|
Refresh view |
refreshes the contents of the CVS Repositories view |
Context menu of the Branches node

|
New ↑ |
allows adding more repositories and data tags |
|
|
|
Refresh Branches ↑ |
refreshes the list of branches displayed in the view |
|
Paste Connection |
allows adding a new repository to the CVS Repositories view by pasting its locations from the clipboard |
|
|
|
Refresh view |
refreshes the contents of the CVS Repositories view |
Context menu of a repository folder
Expand the Head node and right click any folder it contains:

|
allows adding more repositories |
||
|
Check Out |
checks out the selected CVS modules into the workspace as a project of the same name: Keep in mind that only projects
can be checked out. If you check out a folder
with several projects, then this folder will be imported to your
workspace as a project. Thus, the typical project structure (with
source and output folders, etc.) will not be reproduced, and you
won't be able to work with your project:
|
|
|
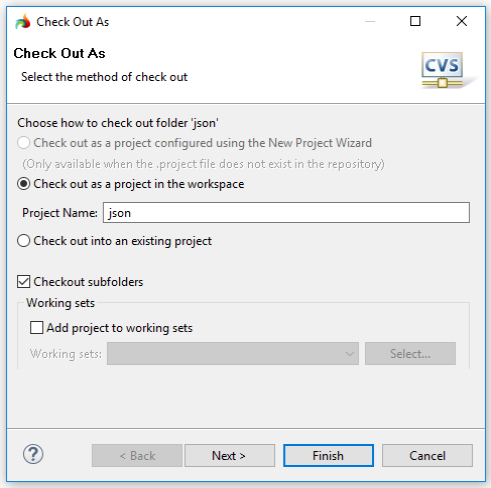
Check Out As |
opens a Check Out wizard where you can select the check out method (read more about checking out here):
|
|
|
versions the selected resource based on the current branch contents (this option is available only if you have the write access to the repository) |
||
|
versions the selected resource based on the current branch contents, moving the tag from previously tagged resources if required (this option is available only if you have the write access to the repository) |
||
|
Compare with |
compares the selected folder with a branch or version in the same folder |
|
|
Expand All |
expands all the items in the selected folder |
|
|
|
Add to Branch List |
adds the selected project to the list of projects displayed under the specified branch in the CVS repositories view:
|
|
|
Configure Branches and Structure |
opens the Configure Branches and Versions dialog. In this dialog, you can find branch and version tags that exist in the repository and add these tags/branches to the CVS repositories view (in order to allow browsing their resources):
|


Context menu of a file in the repository

|
allows adding more repositories |
||
|
|
Tag as Version ↑ |
versions the selected resource based on the current branch contents |
|
Tag with Existing↑ |
versions the selected resource based on the current branch contents, moving the tag from previously tagged resources if required |
|
|
Paste Connection |
allows adding a new repository to the CVS Repositories view by pasting its locations from the clipboard |
|
|
Compare with |
compares the selected folder with a branch or version in the same folder |
|
|
Compare |
opens the comparison dialog |
|
|
|
Show Annotation |
shows the contents of the file with annotations identifying the author of the file:
|
|
|
Show History |
shows the revision history for the selected file in the History view (the view opens automatically, if closed):
|
|
Open |
opens the selected file in the code editor The editor opens in a read-only version. You cannot modify the file.
|
|
|
|
Refresh view |
refreshes the contents of the CVS Repositories view |


