
-
4gl source files which contain your code,
-
form files,
-
theme files,
-
images,
-
text files, and
-
other files like styles and script files, documents, media files, etc.:
Every 4gl program can include 6 groups of files (you can have as many files in each group as you need for your program):
|
|
|
Most files can be created in LyciaStudio by means of the corresponding wizards:
.fm2 forms,
.qxtheme files,
4gl message files,
4gl source files,
Action Defaults files,
C header files,
C source files,
classic text forms,
ESQL/C Source files,
ICU recourse bundles,
message files,
start menu files,
toolbar files,
top menu files, etc.
There are several ways to start the New File wizard:
→ from the New toolbar group of the main toolbar,
→ from the Create a new 4gl source file toolbar group of the main toolbar,
→ from the context menu of the corresponding file group in a 4gl program in the 4GL Project view,
→ from the File menu group: File → New
4gl source files can be also created by the  Create a new 4gl source file toolbar button in the main toolbar:

New File wizards basically follow the same algorithm, so we'll give you only several examples of creating the files most frequently used in 4gl projects:
|
|
|
|
Here you can watch a short video about creating 4gl projects, programs, and source files in LyciaStudio. |
To create a 4gl source file, please follow these steps:
|
Step 1 |
Start the New 4GL Source File wizard in one of the above-mentioned ways:
|
|
Step 2 |
Specify the source folder for the new file and enter its name:
By default, the new files are added to the active project. However, you can select the project and change the source folder by choosing Browser... or typing the necessary path directly in the corresponding field.
|
|
Step 3 |
Specify whether you want the new file to be added as a requirement to a certain program (by default, it is the current program):
You choose among the programs existing in the current project or you can decide to add the file directly to the project (in this case, you have to uncheck all the programs in the list).
|
|
Step 4 |
Add the header to the new file if necessary:
You can edit the header template in the Preference window by pressing Edit header template or going to Window → Preferences → 4GL → Editors → Templates:
|
|
Step 5 |
Choose whether you want to a new 4gl file from a web-service definition:
In this case you have to complete one more step and specify the necessary web-service definition file:
|
|
Step 6 |
When you press Finish, you new 4gl source file is created (you can see it in the project explorer) and opens in the code editor:
|
To create an .fm2 file, please follow these steps:
|
Step 1 |
Start the Window Builder form file wizard in one of the above-mentioned ways:
|
|
Step 2 |
Specify the source folder for the new file and enter its name:
By default, the new files are added to the active project. However, you can select the project and change the source folder by choosing Browser... or typing the necessary path directly in the corresponding field.
|
|
Step 3 |
Specify whether you want the new file to be added as a requirement to a certain program (by default, it is the current program):
You choose among the programs existing in the current project or you can decide to add the file directly to the project (in this case, you have to uncheck all the programs in the list).
|
|
Step 4 |
When you press Finish, you new .fm2 file is created (you can see it in the project explorer) and opens in the XML editor:
|
After an .fm2 file is created, you have to switch to the Design mode and create a form by Lycia Form Designer.
Every newly created 4gl program includes an automatically generated .qxtheme file - the master theme.
Master themes have the same name as the program they are added to and are loaded at runtime by default.
However, you may need more then one graphical theme added to your program.
To create an additional .qxtheme file, please follow these steps:
|
Step 1 |
Start the GUI Theme file wizard in one of the above-mentioned ways:
|
|
Step 2 |
Specify the source folder for the new file and enter its name:
By default, the new files are added to the active project. However, you can select the project and change the source folder by choosing Browser... or typing the necessary path directly in the corresponding field.
|
|
Step 3 |
Specify whether you want the new file to be added as a requirement to a certain program (by default, it is the current program):
You choose among the programs existing in the current project or you can decide to add the file directly to the project (in this case, you have to uncheck all the programs in the list).
|
|
Step 4 |
Choose whether you want the new file to be written to the .tr2 file when the program is deployed (and, thus, will or will not be used by the application at runtime):
|
|
Step 5 |
When you press Finish, you new theme file is created (you can see it in the project explorer) and opens in Lycia Theme Designer:
|
After this, your have to create a new user theme in Lycia Theme Designer.
To create a 4gl message file, please follow these steps:
|
Step 1 |
Start the New message file wizard in one of the above-mentioned ways:
|
|
Step 2 |
Specify the source folder for the new message file and enter its name:
By default, the new files are added to the active project. However, you can select the project and change the source folder by choosing Browser... or typing the necessary path directly in the corresponding field.
|
|
Step 3 |
Specify whether you want the new message file to be added as a requirement to a certain program (by default, it is the current program):
You choose among the programs existing in the current project or you can decide to add the file directly to the project (in this case, you have to uncheck all the programs in the list).
|
|
Step 4 |
Add the header to the new message file if necessary:
You can edit the header template in the Preference window by pressing Edit header template or going to Window → Preferences → 4GL → Editors → Templates:
|
|
Step 5 |
When you press Finish, you new 4gl message file is created (you can see it in the project explorer) and opens in the code editor:
|
4gl programs can include a different media files in addition to source, form, and theme files.
You can create these files from LyciaStudio by means of the New media file wizard:

When creating a new media file, you will follow this algorithm:
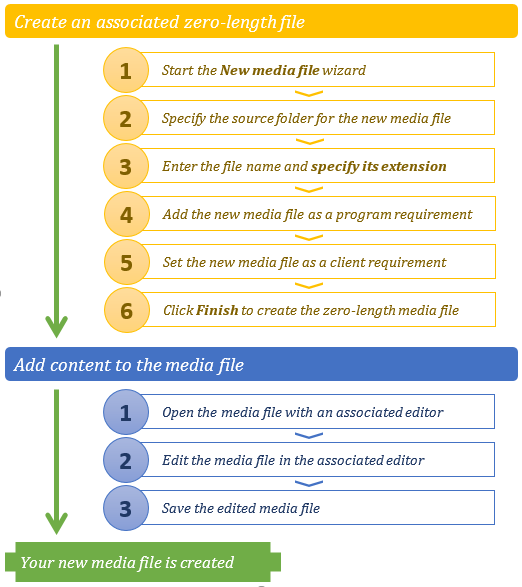
If you chose to create new media files with LyciaStudio, please keep in mind these aspects:
|
|
You have to specify the file extension explicitly because otherwise Lycia will not know what kind of media file you want to create (the Finish button remains disabled until you enter the extension).
|
|
|
After completing the New media file wizard, you will only get an "empty" file which has still to get its contents.
|
|
|
After you press Finish in the New media file wizard, the new media file will open in the editor associated with the specified extension. If you have no associated editors installed in our system, you will not be able to edit the zero-length file and to get the necessary media file. Please remember that viewers are not editors, i.e. they have no editing options.
|


