Synchronizing with CVS repository
Context menu of the Project explorer view includes the Synchronize with Repository menu command that is used to compare the state of the local resources with their remote versions and display the difference to the LyciaStudio user.
To synchronize the resources in your local workspace with their remote versions, please follow these steps.
|
Step 1
|
In the context menu, go to Team → Synchronize with Repository:

By default, after you press Synchronize with Repository, you will get a message about whether the associated perspective -  Team Synchronizing - must be opened depending on the Perspectives preferences: Team Synchronizing - must be opened depending on the Perspectives preferences:

If you choose Yes, the perspective will open; if you choose No, the  Synchronize view will open in the bottom-left part of LyciaStudio, below the code editor. Synchronize view will open in the bottom-left part of LyciaStudio, below the code editor.
|
|
Step 2
|
Press Synchronize...  in the toolbar of the Synchronize view: in the toolbar of the Synchronize view:

|
|
Step 3
|
Select CVS in the list of available synchronization types and press Next (if there are no other repository providers registered for the workbench, then you can bypass this screen):

|
|
Step 4
|
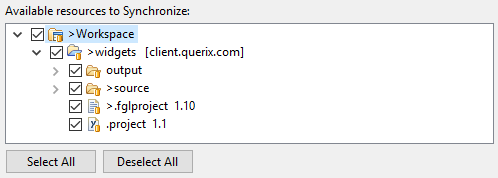
Select the resources you want to synchronize:

You can select one, several, or all the items (use Select All... to do this).
|
|
Step 5
|
Select the resource scope for the synchronization - Workspace, Selected Resources, or Working Set:

|
|
Step 6
|
After you press Finish, the resources in your local workspace will be synchronized with their remote versions.
|

You can pin a project to the Synchronize view.
When you pin the project, it will be present in the Synchronize view regardless of what project you are actually synchronizing. The state if the pinned project will not be changed.
Besides finding out differences between local resources and their remote versions, by synchronizing, you can also adjust the timestamps of outgoing changes: If the contents of your outgoing change matches the contents of the corresponding resource on the repository server, your changes are no longer considered an outgoing change.
Resolving conflicts
Conflicts occur when resources in your local workspace are different from their remote versions.
When you encounter a conflict, you can
§ take the version from the repository branch, discarding your local version,
§ commit your changes and replace the version in the repository, or
§ merge your local version with the remote one and save the merged resource locally.
To resolve a conflict, you can either merge changes manually or choose auto-merging (you can find details here and here).
 By default , conflicting changes get the corresponding text mark-up when merged.
To be able to resolve the conflict, you must view and manipulate the outgoing changes:
|
Step 1
|
Go to Team → Synchronize with Repository in the context menu of the Project Explorer view:

|
|
Step 2
|
In the toolbar of the opened view, press  Outgoing mode to see the outgoing changes: Outgoing mode to see the outgoing changes:

|
|
Step 3
|
Select what will be done with the outgoing change - Commit or Override and update:

§ Commit processes the selected outgoing and auto-manageable conflicting changes. Conflicts that cannot be managed automatically are not committed.
§ Override and Update operates on conflicts. It commits the local copy of the resource into the repository and removes any of the incoming changes.
|
To manage the conflicting changes (in case you do not want to replace them with the local version), follow these steps.
|
Step 1
|
Select Open in Compare Editor in the context menu of the file:

|
|
Step 2
|
The local file and its repository copy will open in the Compare editor:

|
|
Step 3
|
Now you can merge the changes (read more about it here).
|
|
Step 4
|
To mark the conflict as an outgoing change, select from the context menu of the Compare editor Mark as Merged option.
|
Related articles:
CVS Repositories Exploring perspective
CVS Repositories view
Synchronize view

![]() Team Synchronizing - must be opened depending on the Perspectives preferences:
Team Synchronizing - must be opened depending on the Perspectives preferences:
![]() Synchronize view will open in the bottom-left part of LyciaStudio, below the code editor.
Synchronize view will open in the bottom-left part of LyciaStudio, below the code editor. in the toolbar of the Synchronize view:


