Working with patches in CVS repositories
Patch is a piece of software meant to update, fix, or improve the program or its supporting data.
Patches allow sharing projects and programs without storing them in CVS repositories: It can be useful if you do not have write access to the project.
Patches can be applied to the program by a person with write access and committed to the CVS repository.
When working with branches of your CVS repositories, you can create new patches ↓ and apply them ↓.
Create a patch
Patches are created by means of the Create Patch wizard.
There are two ways to start the Create Patch wizard:
-
from the context menu of the project explorer:

-
from the context menu of the Synchronize view:

To create a patch, please follow these steps.
- Clipboard - the patch will be saved to the clipboard (is advisable for small patches);
- File system - the patch will be saved to the specified file in the file system (is generally preferable);
- Workspace - the patch will be saved to the specified file in one of the projects in your workspace.

In the Changes pane, you can preview and adjust the selected patch:

Only checked elements will be included in the patch (you can use Select All... to select all the items in the list).

Diff Output Format allows choosing an output format - unifield, context, or standart.
Both Unifield and Context allow applying the patch, even if the line number mentioned for the hunk is incorrect.
Unifield is used by default by LyciaStudio, Eclipse, and many other patch application tools.
Patch Root allows specifying what level your patch is rooted at:
Workspace (default) allows including resources from multiple projects into your patch. Workspace patches contain enough information for allowing the Apply Patch wizard to figure out which resources must be patched. Workspace patches can be applied to any resource in the workspace.
Project patches are rooted at the project level: The patches can only contain resources from a single project and can be applied only to this project.
Selection patches are rooted at any selected resources but must be applied to the same resource they are rooted at.
Apply a patch
There are two ways to start the Apply patch wizard:
-
from the context menu of the project explorer:

-
from the context menu of the Synchronize view:

To apply a patch from the project explorer, please follow these steps.
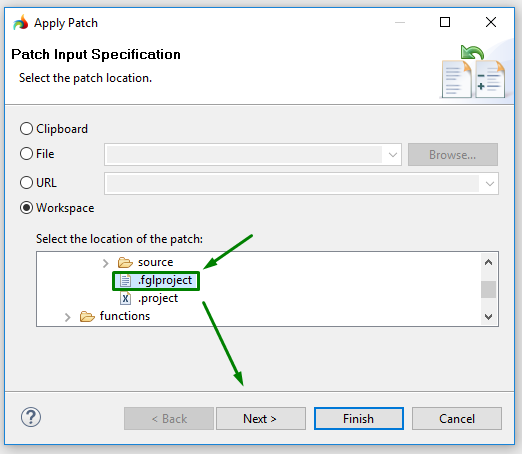
You can click Next to open the Review Patch window ↓ and see whether the patch was applied.
If you cannot apply the patch, you will get this message:

We recommend using file-based patches.
When using URL, make sure that it is valid; otherwise, you won't be able to apply it.

To get successful matches for your patch file, you can select one of these options:
- Ignore leading path name segments can be used if a common prefix of the path names stored in the patch file is not used by the path names in your current workspace.
- Reverse patch can be used for patch files that have already been applied to your workspace, to undo and redo a patch.
- Show matched hunks shows the hunks that have been matched.
- Show Excluded shows the hunks that will not be included in the patch.
- Fuzz factor gives the amount of hunk context lines to ignore. If the fuzz factor is 0, all lines must be matched. If the fuzz factor is greater than 0, the specified number of context lines before and after the hunk will be ignored.
- Generate a .rej file for unmerged hunks creates the .rej files which contain CRLF line delimiters and LF line delimiters.
-
The Patch Content pane can contain entries of two types, file changes and unmatched patch segments (hunks):


By double-clicking the entry in the Patch Content pane, you can inspect changes in the selected file:

If one or more patch segments can be applied to the file , this file will be shown with the incoming change indicator.
If one or more hunks cannot be automatically applied to the file, the hunk entries are displayed as children of the file. If here is a problem with a hunk, the hunk will be indicated with this sign - ![]() .
.
In this case you can apply the hunk manually from the right pane to the file in the left pane. To modify the file on the disk, press Finish.
To apply the patch successfully, you have to resolve all the issues (either manually or by excluding the patch segment from the operation:


To apply a patch from the Synchronize view, please follow these steps.
 - in the


You can click Next to see whether the patch was applied.
