Fetching with the Fetch wizard
There are three basic ways to push your changes to the remote repository: use a Fetch wizard, fetch the changes from upstream, and try a direct fetch.
![]() To be sure that you fetch properly, confirm that all the GIT configurations were properly specified.
To be sure that you fetch properly, confirm that all the GIT configurations were properly specified.
Fetch wizard is the most powerful way to push your changes to a remote repository.
|
Step 0 |
To be able to fetch from a remote repository, you need its URL.
With Bitbucket, you can get the URL of your remote repository from Actions → Clone:
|
||||
|
Step 1 |
To start the Fetch wizard, right-click the selected project and go to Team → Remote → Fetch From ...:
|
||||
|
Step 2 |
In the opened window, insert the URL of the remote repository you want to fetch from into the URI field:
|
||||
|
Step 3 |
The GIT plug-in will automatically retrieve the necessary information like the host, repository path, user, and password from the inserted URL (details can be found here):
|
||||
|
|
Once you have already fetched from the repository (or pushed to it), you'll be able to select it from the drop-down list (after pressing Ctrl+Space)or type the URL in directly :
Once you have configured Fetch from the GIT Repositories view, you will be able to select it from the drop-down list of Configured remote repositories:
|
||||
|
Step 4 |
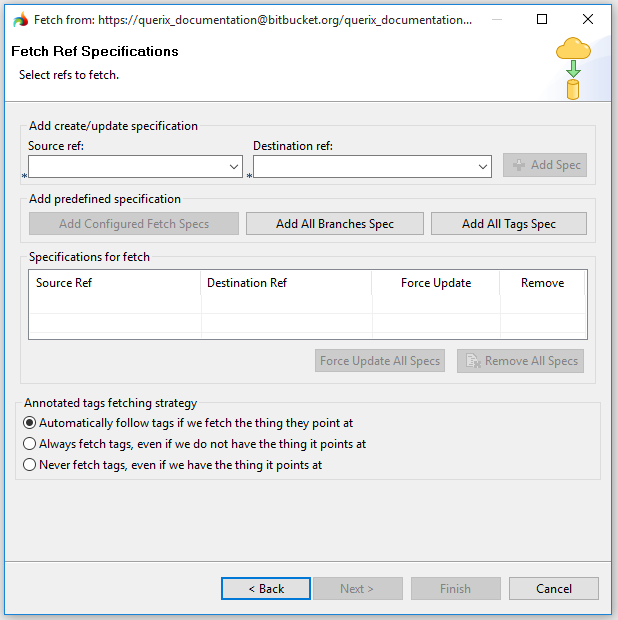
After you press Next, you get to the Fetch Ref Specifications window where you configure your fetch:
Fetch Ref Specifications window is described below in more detail.
|
||||
|
Step 5 |
Once your fetch was configured, press Finish to start fetching:
|
||||
|
Step 6 |
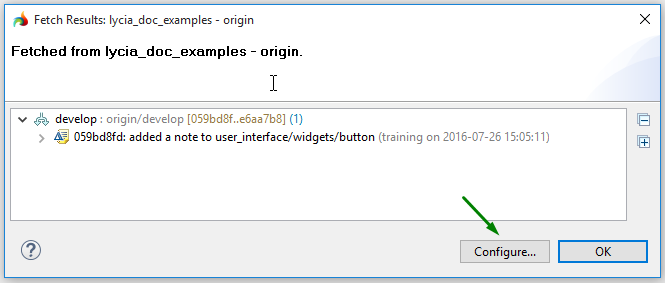
Before the fetch is complete, you'll get the Fetch results window where you will see what is fetched from the remote repository
For ref updates, you get the details of the fetched changes (as above); for refs which are deleted, you get [deleted]:
for refs which not exist yet, you get [new branch] or [new tag]:
for refs which contain now updates, you get [up to date]:
|
||||
|
Now all your changes were fetched from the remote repository.
To go on working with your projects, you have to merge or rebase your branches and import the projects to your workspace:
|
To fetch from the remote repository, you have to define how your local branches and tags refer to remote ones (= specify references).

|
Add create/update specification |
specifies what local branch you want to map with what remote branch:
Source and destination branches are chosen among the existing ones from the drop-down lists:
Add Spec button sends the newly defined specification to the list of Specifications for fetch:
|
|
Add predefined specification |
incorporates predefined specifications:
Add All Branches Spec declares that you want to map your local branch names to the same branch names on the repository you are pushing to. Add All Tags Spec declares that you want to map your local tags one-by-one to the same tags on the repository you are pushing to.
|
|
Specifications for fetch |
contains all the mappings to be fetched:
By default, in the case of a conflict you'll get the opportunity to solve it manually. If you check the Force update box for a specification
or press Force Update All Specs
you declare that in the case of the conflict new commits with overwrite the previous ones.
By pressing Remove All Specs
or clicking the dustbin icon
you'll remove the newly created specifications from the Specifications for fetch list (all of them or one by one):
|
|
Annotated tags fetching strategy |
specifies what the Fetch wizard will do to annotated tags
|
If you add multiple Fetch Ref Specifications and they are in conflict, they will be colored in red. To solve such conflicts, you have to remove or edit the conflicting specs:

![]() If you want to fetch to a completely new (=perfectly empty) repository created from the GIT Repositories view, you have to follow this procedure:
If you want to fetch to a completely new (=perfectly empty) repository created from the GIT Repositories view, you have to follow this procedure:
-- create a folder which will serve as your local repository → ;
-- fetch from the remote repository (from the GIT Repositories view);
-- initialize the repository structure (from the GIT Repositories view);
-- merge or rebase your branches.
Typically, local branches fully correspond to the remote ones, and these remote branches contain all the information necessary to access the remote repository.
If so, you can configure Fetch in such a way that your local branches will be linked with the corresponding branches of the remote repository, and you will be able to fetch without specifying fetch refs (e.g. your local develop commits will be automatically pushed to your remote develop) - by fetching from upstream.
|
Step 1 |
To fetch from upstream, right-click the selected project and go to Team → Fetch from Upstream:
|
|
Step 2 |
Wait until the fetching procedure is over:
|
|
Step 3 |
Check Fetch results:
|
|
Step 4 |
Now all your changes were fetched from the remote repository.
To go on working with your projects, you have to merge or rebase your branches and import the projects to your workspace (as in Step 7 ↑ ).
|
Once your have configured Fetch, you can commit you changes to the local repository directly (from the GIT Repositories view):
|
Step 1 |
Open the GIT perspective as described here.
|
|
Step 2 |
Go to Remotes → origin and choose fetch specification:
|
|
Step 3 |
Right-click the fetch specifications and select Fetch:
|
|
Step 4 |
Wait until the fetching procedure is over:
|
|
Step 5 |
Check Fetch results:
|
|
Step 6 |
Now all your changes were fetched from the remote repository.
To go on working with your projects, you have to merge or rebase your branches and import the projects to your workspace (as in Step 7 ↑ ).
|
Both then Fetching from upstream and fetching directly, you can configure Fetch by pressing Configure and going to the Fetch Configuration dialog:

Related articles:
Pushing to remote repositories
Pulling from remote repositories
Merging
Rebasing