LyciaWeb extension for Google Chrome
Creating customer extensions for Google Chrome
Preparing customer applications with the extended LyciaWeb functionality
To overcome the restrictions in functionality imposed on LyciaWeb, Querix, LTD has added an extension for Google Chrome:
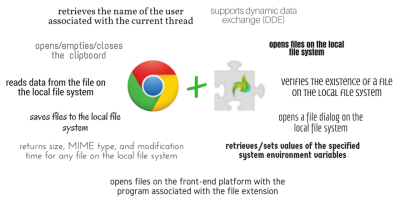
Below you can find the functionality supported by the LyciaWeb extension for Google Chrome compared with the basic functionality of LyciaDesktop and LyciaWeb:
|
|
LyciaDesktop |
LyciaWeb |
LyciaWeb with GC extension |
|
supports Dynamic Data Exchange (DDE) |
|
|
|
|
allows manipulating files located on the file system: |
|
|
|
|
opening file dialogs |
|
|
|
|
opening existing files |
|
|
|
|
returning size, MIME type, and modification time for any file |
|
|
|
|
reading data from the files |
|
|
|
|
saving new files |
|
|
|
|
verifying the existence of an external file by its physical name |
|
|
|
|
allows using built-in functions - winexec(), winexecwait(), winshellexec(), and winshelexecwait(): |
|
|
|
|
for opening a file on the front-end platform with the program associated with the file extension |
|
|
|
|
for executing commands on the OS on which the parent application is run |
|
|
|
|
allows opening, emptying, and closing the clipboard |
|
|
|
|
allows retrieving/setting values of the specified system environment variables |
|
|
|
|
allows retrieving the name of the user associated with the current thread |
|
|
|
LyciaWeb extension is currently available only for Google Chrome.
With any other browser, LyciaWeb functionality still has the restrictions listed here (though similar extensions are planned for implementation).
Adding the extension
To be able to use LyciaWeb extension for Google Chrome, you have to add it first.
On the development station
LyciaWeb extension for Google Chrome is installed together with the Lycia software package and must be enabled after the installation is complete:
On the customer's computer
On the customer's computer, LyciaWeb extension for Chrome must be installed separately.
To provide the necessary level of the computer security, the extension was uploaded to  Chrome Web Store.
LyciaWeb extension for Google Chrome can be added here:
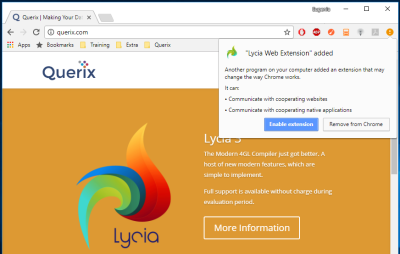
After the extension is added, you will see its icon in the Google Chrome toolbar:
Once the LyciaWeb extension is added, you can remove or hide it from Google Chrome from the toolbar group:
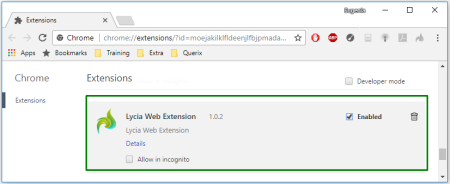
You can enable/disable LyciaWeb for Chrome in the same manner as any other Google Chrome extension - at chrome://extensions/ (also available from the toolbar group):
Using the extension
This means that you can only get the extended LyciaWeb functionality with applications run on the host.
If you want to get the extended LyciaWeb functionality not only for debugging purposes but also for production needs, you need to create your own GC extension based on the basic LyciaWeb extension.
Creating customer extensions for Google Chrome
To create your own GC extension based on the basic LyciaWeb extension for Google Chrome, you have to do this:
Step 1. Download the source code of the LyciaWeb extension for Google Chrome here.
Step 2. Create a new extension based on the downloaded source code (includes changing the name and the description at the very least).
For example,
"https://*.my_company.com/*"
"*://*.my_org.org/*"
Refer here to learn more about the externally_connectable manifest property and how it is set.
Step 4. Upload the new extension to  Chrome Web Store.
Step 5. Get the extension's ID from  Chrome Web Store.
Step 6. Set the QXLW_CHROME_EXTENSION_ID environment variable so as it is read when Lycia Web Server (= Jetty) is started.
Step 7. Specify the extension's ID (Step 5) as the value for QXLW_CHROME_EXTENSION_ID.
After this, you will be able to run applications on the specified host with the extended LyciaWeb functionality.
Preparing customer applications with the extended LyciaWeb functionality
To be able to use your applications with the extended LyciaWeb functionality, your end users must add LyciaWeb extension for Google Chrome.
However, it may seem inconvenient for them if they need to manually add extensions to be able to work with your applications.
That is why you might find it useful to prepare an installer for your application that will automatically install LyciaWeb extension for Google Chrome as well.
To make it easier for you to prepare this installer, Querix, LTD has prepared a template package that already includes the template installer and the template GC extension. You can download this package here.
To prepare your application for using the extended LyciaWeb functionality, you must follow these steps.
Step 1. Download the template package here.
Step 2. Make sure that you have set the LYCIA_DIR environment variable.
Step 3. Download and install WiX toolset.
Step 4. Create your own GC extension based on the downloaded extension template as described here.
This involves (at the very least):
- changing the LyciaWeb extension ID to the extension ID of your GC extension,
- changing the name of the GC extension, the product name, and the manufacture in the corresponding properties,
- renaming the .wxs installer script, etc.
Step 6. Edit the .bat files to include the new name of the installer script.
This file is located at
LYCIA_DIR\LyciaWeb Chrome Extension.
Step 8 (optional). Upload your application to the host specified in the manifest.json file.
Step 9. Provide the installer to your end users (e.g., upload it to your web site).
Now, when your end users will run your application installer they will have your GC extension installed automatically and will enjoy the extended LyciaWeb functionality when working with your application.


